Photobucket Photobucket Photobucket Photobucket

January 31, 2010

Hello Yellow!!

I'm trying my best to ignore the the chaos that is ALL OF MY HOUSE right now because of our multiple construction projects. However, my craft room is coming along nicely. Chris has been a painting mad man. I keep sticking furniture in front of him and he hasn't complained one single bit. That's love!!


Speaking of love, I'm in love with my yellow craft room.

Yellow makes me happy!

It is a comforting color.

It was one of my favorite bedroom colors growing up.

My new craft room has butter y~e~l~l~o~w walls and one apple green wall.


Here are a few other y~e~l~l~o~w accessories going in my craft room…

Miniature hand-painted house...made by my mom

Fern Bisel Peat print from Round the Mulberry Bush, 1933

Quilt wall-hanging made by my mom

Festive paper lanterns

Miniature doll dresser from Allegan Antique market

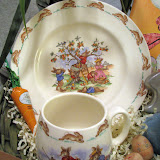
Doll dishes from Allegan Antique market

Owl teapot from my favorite local antique store in Grandville

Believe it or not, we're close to being done with the construction of my craft room. The ceiling drywall (which will patch up the holes from the new heat runs) will be finished Monday. Chris just needs to find the time to install wood flooring (darn those pesky full time jobs). Last but not least, my new counter top for my workspace is suppose to arrive on Friday!! Can you feel my excitement??

January 30, 2010

It's all about the hair!!

Tried growing it out. Got tired of it. Cut it. I'm a free woman!!

Emma and I had beauty salon appointments on Saturday. Isn't she lovely?

My other little artist...

Emma created something equally as wonderful this week for Valentine's Day.

Supplies for this project:

Glue
Unsharpened pencils
Tissue paper cut up into squares
Construction paper cut in the shape of a large heart.

Step 1. Take the tissue paper square and wrap it around the center of a unused pencil (or the eraser pencil top). Be sure to wrap the paper around the pencil to form a cup shape.

Step 2. Pour glue onto a paper plate or a plastic lid, dip the bottom of the tissue paper onto glue and place the pencil with the tissue paper onto your heart. Pull the pencil out gently leaving the tissue paper glued onto the paper. You can work in rows, using different colored tissue paper, or just place the tissue on any way you want. Once you get used to wrapping the paper around the pencil to form a cup, the process does go pretty fast.


We used this technique a few years ago and made Tissue Paper Dragon Masks. See here for information on this CNY craft project.


Happy Crafting! Happy Saturday!

January 28, 2010

My littlest artist

Josie brought this drawing home from daycare today.

It sooooo reminds me of Emma's first drawings. Love it!!

January 27, 2010

Savoring the peace & quiet...

Our downstairs is definitely under wraps with our construction project.

I'm hiding upstairs, enjoying the glow of my Chinese New Year tree from our sunroom.


May each of you find a little corner of peace & happiness.

January 26, 2010

CNY Lanterns

Last year, Emma and I recycled glass jars and made these Chinese New Year lanterns. See this previous post for directions.


I've been thinking that since it's the year of the Tiger, we might need to get creative and make a few tiger lanterns. I've got loads of orange and black tissue paper left over from Halloween and a refrigerator that needs to be cleaned again. I'll have to let you know how it goes after this weekend. In the mean time, here a few ideas that I found online that can be printed off and colored. Completely toddler friendly...woo hoo!

Kiddyhouse CNY Lantern

CNY Lion Dance Printable

January 25, 2010

Pardon our dust...

Our heating and cooling contractors arrive Tuesday to cut into our downstairs ceiling/walls to make way for our new heating system. I can't WAIT! However, I'm not looking forward to the dusty mess and I'm pretty sure our cat is going to hate us.

Currently, our downstairs is partially finished (minus Emma's new room and my craft room) which means we've had to get creative with storing toys, furniture and "stuff". There's no way around it. It's going to be messy for awhile.

Here's a sneak peek at the some of the before and after shots of the furniture going in my craft room.

Before


After


Close-up of the cherry blossom-paper lanterns


Before


After


I'm going with fruity colors in my craft room. Butter yellow walls (which haven't happened yet) with apple green and melon furniture. The yellow/green cabinet is getting a new countertop large enough to be island for working on projects. It was ordered on Saturday from Lowe's. I can hardly contain myself. Let's just hope I can keep my obsessive compulsive tendencies in check while the contractors are busy working. Bring on the mess!

January 23, 2010

Show and Tell...

I have the BEST husband.

I found THIS at an antique store and thought it would be perfect for my craft room.

He went back and got it. Brought it home.

And he's already put on 2 coats of melon paint.

I can't wait to fill it with all kinds of THIS.

And yes, I've begun sorting our scary storage room.

Lettuce Wraps - CNY Dish

My new Phyllis Hoffman magazine (Celebrate) featured Lettuce Wraps and I thought I'd give it try. Not bad. This would be a fun dish for Chinese New Year celebrations.

Ingredients:
12 or more large lettuce leaves (washed and dried). The recipe called for butter leaves. I couldn't find them at our local MI grocery store, so I got creative with my lettuce leaves.
2 packages of cooked Chinese noodles
3 cups shredded cooked chicken
1/2 cup shredded carrots
1/2 cup thinly sliced green onion
1/4cup chopped dry-roasted peanuts
1 Tablespoon cooking oil
1/4 cup peanut butter
3 Tablespoons soy sauce
3 Tablespoons sesame oil
2 Tablespoons honey
2 tablespoons lemon juice

In a large bowl, combine cooked noodles, chicken, carrots, green onion and peanuts. In a medium bowl, whisk together peanut butter, soy sauce, sesame oil, honey and lemon juice. Spoon chicken mixture into lettuce leaves. Serve immediately. Use the peanut butter sauce for dipping. You can also pour the peanut sauce over the mixture before you put into the lettuce wraps. Enjoy!

January 21, 2010

Recycle fingerpaintings into new artwork!

I've said this before, but I appreciate all the fingerpaintings that Josie brings home from daycare. Her daycare gets the MESS and I enjoy coming up with new ways to recycle them into different artwork. I currently have this snowman hanging on my office door at work.


Last February, the girls helped me make a lovely Valentine bouquet out of Josie's fingerpaintings.


Back in March, we made this Easter basket out of a recycled fingerpaintings.

And this past November, we decorated my sister's birthday packages with this fingerpainting idea.

Josie came home with another large fingerpainting that's just waiting for a makeover. Be sure to act surprised, Aunt Jean. You've got some artwork coming your way on Sunday! Perhaps I can think up something to make for Chinese New Year's. I think Josie and I might have to sneak in one craft Saturday morning before I attempt to clean my storage room.

Happy crafting. I'm so ready for the weekend.